Celebrate fall by creating a one-of-a-kind Autumn Wreath. First collect your supplies and find a good workspace. We took advantage of a sale and picked up some florals and a grapevine wreath. You can use the same procedure for a Holiday Wreath or Spring Wreath.
Step 1: Assemble what you will need:
– A good workspace
-Glue gun
– Floral wire
– Wired ribbon (I chose orange)
– Pliers
– Wire cutters
– Floral Stems (Large blooms, Medium A blooms, Medium B blooms, Seeded stems, Fall leaves, Bird)
[pe2-image src=”http://lh6.ggpht.com/-1rQwccIfu_4/Um2YoFkM86I/AAAAAAAACAA/yLYBGYpIBLk/s144-c-o/SDC11875-002.JPG” href=”https://picasaweb.google.com/110956043075394460751/SeamcrazyAutumnWreath#5939571298027762594″ caption=”” type=”image” alt=”SDC11875-002.JPG” ]
Step 2: Remove tags from stems. Clip stems to separate blooms.
[pe2-image src=”http://lh5.ggpht.com/-yEoIpaCVTTs/Um2YmtRRDLI/AAAAAAAAB_4/12YqX4DgQPA/s144-c-o/SDC11878-002.JPG” href=”https://picasaweb.google.com/110956043075394460751/SeamcrazyAutumnWreath#5939571274326019250″ caption=”” type=”image” alt=”SDC11878-002.JPG” ]
Step 3: Push up leaves, cut stems to shorten. Do not discard any leaves.
[pe2-image src=”http://lh4.ggpht.com/-uw0tdqs3zRo/Um2Yp9SPUPI/AAAAAAAACAI/PSg-pZUbYvA/s144-c-o/SDC11880-001.JPG” href=”https://picasaweb.google.com/110956043075394460751/SeamcrazyAutumnWreath#5939571330164674802″ caption=”” type=”image” alt=”SDC11880-001.JPG” ]
Step 4: Cut five 5″ pieces of floral wire. Gather one Large bloom, one Medium A bloom, and one Medium B bloom, and wrap a piece of floral wire around the stems to make a rosette. Do this five times, so that you have five rosettes. Set the rosettes aside.
[pe2-image src=”http://lh3.ggpht.com/-sBQm0H3dyO8/Um2YskXzTkI/AAAAAAAACAY/qi0PKw7MOb0/s144-c-o/SDC11882-001.JPG” href=”https://picasaweb.google.com/110956043075394460751/SeamcrazyAutumnWreath#5939571375016726082″ caption=”” type=”image” alt=”SDC11882-001.JPG” ]
[pe2-image src=”http://lh3.ggpht.com/-xyQYr74G4Wc/Um2YueiEjQI/AAAAAAAACAg/nqbqQ6kTAc8/s144-c-o/SDC11883-001.JPG” href=”https://picasaweb.google.com/110956043075394460751/SeamcrazyAutumnWreath#5939571407808924930″ caption=”” type=”image” alt=”SDC11883-001.JPG” ]
Step 5: Now we will make a florists’ bow. These take a little bit of practice, but once you learn you will never forget! Cut an 8″ piece of floral wire and set it aside – we will need it in a minute. Take the wired ribbon and make a loop, pinching it with your thumb and forefinger. Now, twist the ribbon. Pinch the twist between your thumb and forefinger. That is the secret – every time you loop, and pinch, twist before the next loop.
[pe2-image src=”http://lh5.ggpht.com/-8hgFluAFR8s/Um2Yxt11FmI/AAAAAAAACAw/6OxnDhIN6fA/s144-c-o/SDC11885-001.JPG” href=”https://picasaweb.google.com/110956043075394460751/SeamcrazyAutumnWreath#5939571463457936994″ caption=”” type=”image” alt=”SDC11885-001.JPG” ]
Keep making slightly larger loops each time until you use up most of the ribbon. Leave enough for two streamer tails.
[pe2-image src=”http://lh6.ggpht.com/-UaI_2FvqbAA/Um2YwNOY0qI/AAAAAAAACAo/7Nr2-9cN6FA/s144-c-o/SDC11886-001.JPG” href=”https://picasaweb.google.com/110956043075394460751/SeamcrazyAutumnWreath#5939571437522703010″ caption=”” type=”image” alt=”SDC11886-001.JPG” ]
Take the 8″ piece of floral wire and thread it through the loops that you have pinched. Circle it around and twist the wire securely – very securely.
[pe2-image src=”http://lh3.ggpht.com/-ZM1JL14WCGc/Um2Yy6rSv8I/AAAAAAAACA4/EW9Cr99kthA/s144-c-o/SDC11887-001.JPG” href=”https://picasaweb.google.com/110956043075394460751/SeamcrazyAutumnWreath#5939571484083273666″ caption=”” type=”image” alt=”SDC11887-001.JPG” ]
Now, turn the ribbon around and using both hands, pull the loops out using a twisting motion to shape the bow.
Step 6: Position the rosettes and the bow on your grapevine wreath. You haven’t glued them down yet but you will in a minute. Make the spacing pleasing to the eye. Plug in the glue gun.
[pe2-image src=”http://lh3.ggpht.com/-xVFPSi8QUeo/Um2Y0ajIqpI/AAAAAAAACBA/QCnTVnx5Naw/s144-c-o/SDC11890-001.JPG” href=”https://picasaweb.google.com/110956043075394460751/SeamcrazyAutumnWreath#5939571509818862226″ caption=”” type=”image” alt=”SDC11890-001.JPG” ]
Step 7: Turn over each rosette and put a glob of glue on the back, right where you used wire to hold the rosette together. Press the glued rosette into the grapevine wreath just where you want it. Repeat for each of the rosettes.
[pe2-image src=”http://lh4.ggpht.com/-z6EB2uASvK0/Um2Y1yy3IeI/AAAAAAAACBI/mmPSvLeM-uo/s144-c-o/SDC11893-001.JPG” href=”https://picasaweb.google.com/110956043075394460751/SeamcrazyAutumnWreath#5939571533507142114″ caption=”” type=”image” alt=”SDC11893-001.JPG” ]
Step 8: Now, put some glue on the back of the seeded stems, the leftover floral stem leaves, and the fall leaves, and push them onto the wreath between each rosette.
[pe2-image src=”http://lh4.ggpht.com/-Le2AMWNGero/Um2Y3stAFkI/AAAAAAAACBQ/hfc5TPcPWmw/s144-c-o/SDC11897-001.JPG” href=”https://picasaweb.google.com/110956043075394460751/SeamcrazyAutumnWreath#5939571566231688770″ caption=”” type=”image” alt=”SDC11897-001.JPG” ]
Step 9: Using the wire that you used to assemble the bow, attach the bow to the grapevine wreath. I added some seeded stems behind the bow. Then I added a little bird I found in the floral section.
[pe2-image src=”http://lh3.ggpht.com/-lINaRbcuqKU/Um2Y94NSq_I/AAAAAAAACBw/v58eMbzG9ys/s144-c-o/SDC11906-001.JPG” href=”https://picasaweb.google.com/110956043075394460751/SeamcrazyAutumnWreath#5939571672399129586″ caption=”” type=”image” alt=”SDC11906-001.JPG” ]
Step 10: Cut a 12″ piece of floral wire; fold it in half. On the back at the top of the grapevine wreath, poke the folded end through some of the vines, pulling it through. Using your pliers, wrap the ends around to make a looped hanger. Or, use a purchased hanger or even a large bent paper clip.
[pe2-image src=”http://lh6.ggpht.com/-NZVwc33Azx8/Um2Y8fErtNI/AAAAAAAACBo/bLnFWJJxrqk/s144-c-o/SDC11905-001.JPG” href=”https://picasaweb.google.com/110956043075394460751/SeamcrazyAutumnWreath#5939571648472265938″ caption=”” type=”image” alt=”SDC11905-001.JPG” ]
Step 11: Hold up the wreath by the looped hanger, and even up the ribbon ends.
[pe2-image src=”http://lh6.ggpht.com/-972RsChBGw0/Um2Y6ggyh5I/AAAAAAAACBg/Vwtz8ZJo064/s144-c-o/SDC11899-001.JPG” href=”https://picasaweb.google.com/110956043075394460751/SeamcrazyAutumnWreath#5939571614498850706″ caption=”” type=”image” alt=”SDC11899-001.JPG” ]
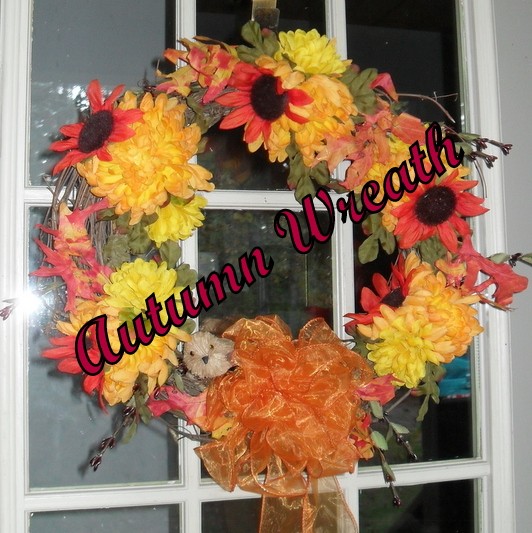
Step 12: Hang your completed Autumn Wreath on your door! Doesn’t it look pretty?
[pe2-image src=”http://lh6.ggpht.com/-lq-1vqTRD0Q/Um2Y_LTEfSI/AAAAAAAACB4/Z_b886qorG8/s144-c-o/SDC11907-001.JPG” href=”https://picasaweb.google.com/110956043075394460751/SeamcrazyAutumnWreath#5939571694703508770″ caption=”” type=”image” alt=”SDC11907-001.JPG” ]